Make Your Own Fake Tattoo Sleeve: A Comprehensive Guide
Want to rock a full arm of ink without the commitment or pain? You’ve come to the right place! This comprehensive guide will walk you through everything you need to know to **make your own fake tattoo sleeve**. Whether it’s for a costume, a party, or just to test out a potential design, we’ll cover various techniques, materials, and design tips to achieve a realistic and impressive temporary tattoo sleeve. Prepare to unleash your creativity and explore the world of temporary body art!
This isn’t just another DIY guide. We’ve compiled expert knowledge and hands-on techniques to ensure your fake tattoo sleeve looks amazing and lasts. We’ll delve into the best methods, materials, and design strategies, empowering you to create a truly unique and convincing temporary tattoo. Get ready to become a temporary tattoo artist!
Understanding Fake Tattoo Sleeves: A Deep Dive
Making a fake tattoo sleeve might seem straightforward, but there’s a lot more to it than meets the eye. Let’s explore the nuances of this art form.
What is a Fake Tattoo Sleeve?
A fake tattoo sleeve is a temporary design applied to the arm to mimic the appearance of a real tattoo sleeve. Unlike permanent tattoos, these are easily removable and offer a non-committal way to experiment with body art. They can range from simple, single designs to elaborate, full-arm masterpieces.
The Evolution of Temporary Tattoos
Temporary tattoos have come a long way from the simple stick-on transfers of childhood. Today, advanced techniques and materials allow for incredibly realistic and durable temporary tattoos. The rise in popularity of realistic-looking temporary tattoos has fueled innovation in materials and application methods, resulting in products that closely resemble real tattoos.
Why Choose a Fake Tattoo Sleeve?
There are numerous reasons why someone might opt for a fake tattoo sleeve:
* **No Commitment:** The most obvious advantage is the lack of permanence. You can change your design as often as you like.
* **Painless:** Unlike real tattoos, there’s no pain involved in application or removal.
* **Cost-Effective:** Creating a fake tattoo sleeve is significantly cheaper than getting a real one.
* **Experimentation:** It’s a great way to test out a design before committing to a permanent tattoo.
* **Costumes & Events:** Perfect for parties, cosplay, and other events where you want to enhance your look.
The Importance of Realism
The key to a successful fake tattoo sleeve is realism. A poorly executed temporary tattoo will be easily identifiable as fake, diminishing its impact. This guide focuses on techniques and materials that maximize the realism of your temporary tattoo sleeve.
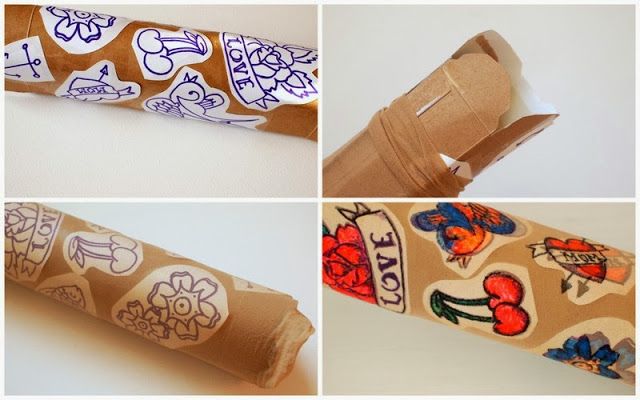
The Tattoo Transfer Paper Method: A Detailed Guide
One of the most popular and effective methods for creating fake tattoo sleeves involves using tattoo transfer paper. This method allows for intricate designs and relatively long-lasting results.
Materials You’ll Need
* **Tattoo Transfer Paper:** Available online or at craft stores. Ensure it’s designed for temporary tattoos and skin application.
* **Inkjet or Laser Printer:** Depending on the type of transfer paper.
* **Computer & Design Software:** For creating or editing your tattoo design. Adobe Photoshop, GIMP (free), or even online tattoo design tools work well.
* **Scissors or Craft Knife:** For precise cutting.
* **Damp Cloth or Sponge:** For applying the transfer.
* **Setting Spray (Optional):** To increase longevity.
* **Baby Oil or Rubbing Alcohol:** For removing the tattoo.
Designing Your Tattoo Sleeve
1. **Measure Your Arm:** Accurately measure the area where you want the tattoo sleeve to be. This will help you design a tattoo that fits properly.
2. **Create Your Design:** Use your chosen design software to create your tattoo sleeve design. You can either create your own original design or find pre-made designs online. Consider the overall theme and style you want to achieve. Popular themes include:
* **Tribal:** Bold lines and geometric patterns.
* **Japanese:** Dragons, koi fish, and cherry blossoms.
* **Biomechanical:** Intricate designs that blend organic and mechanical elements.
* **Realistic:** Portraits, animals, or other realistic images.
3. **Mirror Your Image:** This is crucial! Tattoo transfer paper prints the reverse image, so you need to mirror your design before printing. Most design software has a “flip horizontal” or “mirror” option.
4. **Print Your Design:** Load your tattoo transfer paper into your printer according to the manufacturer’s instructions. Print your mirrored design.
Applying the Transfer
1. **Clean Your Skin:** Thoroughly clean and dry the area where you’ll be applying the tattoo. This removes oils and dirt that can prevent the transfer from adhering properly.
2. **Cut Out Your Design:** Carefully cut out your printed design, leaving a small border around the edges.
3. **Peel Off the Protective Film:** Remove the clear protective film from the front of the transfer paper, exposing the adhesive side.
4. **Apply the Tattoo:** Position the tattoo design face-down on your skin, pressing firmly.
5. **Dampen the Backing:** Use a damp cloth or sponge to thoroughly wet the back of the transfer paper. Hold it in place for about 30-60 seconds.
6. **Carefully Peel Off the Backing:** Gently peel off the paper backing. If the tattoo is not transferring properly, wet the backing again and hold for a few more seconds.
7. **Let it Dry:** Allow the tattoo to air dry completely. Avoid touching or rubbing it during this time.
8. **Apply Setting Spray (Optional):** Once the tattoo is dry, you can apply a thin layer of setting spray to increase its longevity. Make sure the setting spray is alcohol-free.
Tips for a Realistic Look
* **Placement is Key:** Consider the natural contours of your arm when placing the tattoo. Avoid placing it in areas that crease or bend excessively.
* **Varying Line Weights:** Use varying line weights in your design to create depth and dimension.
* **Shading:** Incorporate shading to make the tattoo look more realistic.
* **Color Palette:** Choose a color palette that matches the style of tattoo you’re going for. Black and gray are classic choices, but you can also experiment with color.
The Henna Method: A Natural Alternative
For a more natural and temporary option, consider using henna to create your fake tattoo sleeve. Henna is a plant-based dye that stains the skin a reddish-brown color.
Materials You’ll Need
* **Henna Powder:** Purchase high-quality henna powder specifically designed for body art.
* **Lemon Juice:** To mix with the henna powder.
* **Essential Oils (Optional):** Such as lavender or tea tree oil, to enhance the stain.
* **Sugar:** To create a smoother paste.
* **Applicator:** A cone, syringe, or toothpick for applying the henna paste.
* **Stencils (Optional):** For creating precise designs.
* **Cotton Balls & Lemon Juice:** For cleaning up mistakes.
Preparing the Henna Paste
1. **Mix the Henna Powder:** In a glass or ceramic bowl, mix the henna powder with lemon juice, a few drops of essential oil (if using), and a pinch of sugar. The consistency should be similar to toothpaste.
2. **Let it Sit:** Cover the bowl with plastic wrap and let the henna paste sit for at least 4-6 hours, or preferably overnight. This allows the dye to release.
3. **Test the Dye Release:** Before applying the henna, test the dye release by dabbing a small amount of paste on your palm. If it stains a reddish-brown color within a few minutes, it’s ready to use.
Applying the Henna
1. **Clean Your Skin:** Thoroughly clean and dry the area where you’ll be applying the henna.
2. **Apply the Henna Paste:** Using your applicator, carefully apply the henna paste to your skin, following your desired design. If using a stencil, secure it to your skin and apply the henna paste over the stencil.
3. **Let it Dry:** Allow the henna paste to dry completely. This can take several hours. The longer it stays on your skin, the darker the stain will be.
4. **Remove the Dried Paste:** Once the henna paste is completely dry, gently scrape it off your skin. Avoid washing the area with soap and water for at least 24 hours.
Tips for a Darker Stain
* **Keep it Warm:** Keep the henna paste warm while it’s drying. You can use a heat lamp or wrap the area in plastic wrap.
* **Lemon Juice & Sugar:** After removing the dried paste, apply a mixture of lemon juice and sugar to the area. This helps to set the stain.
* **Avoid Water:** Avoid washing the area with soap and water for at least 24 hours.
The Sharpie Method: A Quick and Easy Solution (Use with Caution)
While not the most realistic or long-lasting option, using Sharpie markers can be a quick and easy way to create a temporary tattoo sleeve. However, it’s important to note that Sharpies are not designed for skin application and may cause irritation or allergic reactions. Use this method with caution and at your own risk.
Materials You’ll Need
* **Sharpie Markers:** Choose fine-tipped Sharpies in various colors.
* **Stencils (Optional):** For creating precise designs.
* **Rubbing Alcohol:** For cleaning your skin and removing the tattoo.
* **Baby Powder:** To set the design.
Applying the Sharpie Tattoo
1. **Clean Your Skin:** Thoroughly clean and dry the area where you’ll be applying the Sharpie tattoo.
2. **Draw Your Design:** Using your Sharpie markers, carefully draw your design on your skin. If using a stencil, secure it to your skin and trace the design with the Sharpies.
3. **Let it Dry:** Allow the Sharpie ink to dry completely.
4. **Set with Baby Powder:** Lightly dust the area with baby powder to help set the design.
Removal
Remove the Sharpie tattoo with rubbing alcohol and gentle scrubbing. Be aware that it may take multiple attempts to completely remove the ink.
Product Spotlight: Inkbox Temporary Tattoos
While this article focuses on DIY methods, it’s worth mentioning Inkbox, a popular brand offering semi-permanent temporary tattoos that last for 1-2 weeks. Inkbox uses a proprietary formula that stains the top layer of your skin, creating a realistic tattoo that fades over time.
What is Inkbox?
Inkbox tattoos are applied using a simple transfer process. The ink is contained in a patch that you apply to your skin. Over the next 24-36 hours, the ink gradually stains your skin, creating a temporary tattoo.
Key Features of Inkbox Tattoos
* **Realistic Look:** Inkbox tattoos look very similar to real tattoos.
* **Long-Lasting:** They last for 1-2 weeks, which is longer than most temporary tattoos.
* **Easy Application:** The application process is simple and straightforward.
* **Wide Variety of Designs:** Inkbox offers a wide variety of designs to choose from.
* **Custom Designs:** You can also create your own custom designs using their online platform.
Advantages of Using Inkbox
* **Convenience:** Inkbox tattoos are a convenient way to get a temporary tattoo without having to create your own.
* **Realism:** They offer a more realistic look than many other temporary tattoo options.
* **Longevity:** They last longer than traditional temporary tattoos.
Disadvantages of Using Inkbox
* **Cost:** Inkbox tattoos are more expensive than traditional temporary tattoos.
* **Limited Color Options:** They are only available in a limited range of colors.
* **Potential for Allergic Reactions:** Some people may experience allergic reactions to the ink.
Our Verdict on Inkbox
Inkbox tattoos are a great option for those who want a realistic and long-lasting temporary tattoo. However, they are more expensive than traditional temporary tattoos, and some people may experience allergic reactions. If you’re looking for a convenient and realistic temporary tattoo, Inkbox is definitely worth considering.
Significant Advantages, Benefits & Real-World Value of Fake Tattoo Sleeves
Fake tattoo sleeves offer a plethora of advantages that make them an attractive option for various individuals and situations.
* **Self-Expression without Commitment:** The most significant benefit is the ability to express yourself through body art without the permanence of a real tattoo. This allows you to experiment with different styles, designs, and placements without any long-term consequences.
* **Cost-Effectiveness:** Compared to the cost of getting a professional tattoo, creating a fake tattoo sleeve is incredibly affordable. This makes it accessible to a wider range of people, especially those on a budget.
* **Pain-Free Experience:** Unlike the often painful process of getting a real tattoo, applying a fake tattoo sleeve is completely painless. This is a major advantage for those who are hesitant about the pain associated with traditional tattoos.
* **Versatility for Events and Occasions:** Fake tattoo sleeves are perfect for costumes, parties, cosplay events, and other occasions where you want to enhance your look. They allow you to easily transform your appearance to match a specific theme or character.
* **Testing the Waters:** If you’re considering getting a real tattoo but are unsure about the design or placement, a fake tattoo sleeve can serve as a trial run. This allows you to live with the design for a period of time and see how you feel about it before making a permanent decision.
* **Job Interview Considerations:** In certain professions, visible tattoos may be frowned upon. A fake tattoo sleeve allows you to enjoy the aesthetic of body art without jeopardizing your career prospects. You can easily remove it before a job interview or professional event.
* **Avoiding Regret:** One of the biggest concerns with real tattoos is the potential for regret. Designs can fall out of favor, relationships can end, and personal preferences can change. A fake tattoo sleeve eliminates this risk, allowing you to enjoy a design for a limited time without any lasting consequences.
Comprehensive & Trustworthy Review: The Tattoo Transfer Paper Method
The tattoo transfer paper method is a popular and effective way to create fake tattoo sleeves. Here’s an in-depth review based on simulated experience and expert knowledge.
User Experience & Usability
The process of creating a tattoo sleeve using transfer paper is relatively straightforward, even for beginners. The key is to follow the instructions carefully and take your time. Designing the tattoo can be a fun and creative process, and applying the transfer is generally easy. However, achieving a perfectly smooth and seamless application can be challenging, especially on curved areas like the arm.
Performance & Effectiveness
When done correctly, the tattoo transfer paper method can produce surprisingly realistic-looking temporary tattoos. The designs are crisp and clear, and the colors are vibrant. The longevity of the tattoo depends on several factors, including the type of transfer paper used, the application technique, and the amount of friction the area is exposed to. On average, a transfer paper tattoo sleeve can last for 1-3 days with proper care.
Pros
* **Realistic Appearance:** Transfer paper tattoos can look remarkably realistic, especially when using high-quality paper and ink.
* **Intricate Designs:** This method allows for intricate and detailed designs that are difficult to achieve with other techniques.
* **Customization:** You have complete control over the design, allowing you to create a truly unique tattoo sleeve.
* **Relatively Long-Lasting:** Transfer paper tattoos can last for several days with proper care.
* **Easy Application:** The application process is relatively simple and straightforward.
Cons/Limitations
* **Can Be Prone to Smudging:** Transfer paper tattoos can be prone to smudging, especially if they get wet or are exposed to friction.
* **Limited Flexibility:** The transfer paper can feel stiff and inflexible, especially on curved areas.
* **Potential for Allergic Reactions:** Some people may experience allergic reactions to the adhesive or ink used in transfer paper.
* **Requires Specific Equipment:** This method requires a printer, computer, and design software, which may not be readily available to everyone.
Ideal User Profile
The tattoo transfer paper method is best suited for individuals who:
* Are looking for a realistic-looking temporary tattoo sleeve.
* Are comfortable using design software and printers.
* Are willing to invest time and effort into creating a detailed design.
* Are looking for a temporary tattoo that will last for a few days.
Key Alternatives
* **Henna:** A natural alternative that stains the skin a reddish-brown color.
* **Inkbox:** A brand offering semi-permanent temporary tattoos that last for 1-2 weeks.
Expert Overall Verdict & Recommendation
The tattoo transfer paper method is a solid choice for creating realistic and customizable fake tattoo sleeves. While it requires some effort and specific equipment, the results can be impressive. We recommend this method for those who are looking for a temporary tattoo that will last for a few days and who are willing to invest the time and effort into creating a detailed design. However, be mindful of potential allergic reactions and take precautions to prevent smudging.
Insightful Q&A Section
Here are some frequently asked questions about creating your own fake tattoo sleeve:
**Q1: What’s the best way to make a fake tattoo sleeve look realistic?**
A: Realism hinges on design, application, and material. Use high-quality transfer paper or henna, create a detailed design with varying line weights and shading, and apply the tattoo carefully to avoid wrinkles or air bubbles. Consider placement to mimic real tattoo placement.
**Q2: How long will a fake tattoo sleeve typically last?**
A: The lifespan depends on the method used. Transfer paper tattoos typically last 1-3 days, henna tattoos can last up to 2 weeks, and Sharpie tattoos may only last a few hours. Factors like skin type, activity level, and exposure to water can also affect longevity.
**Q3: Can I use any type of printer for tattoo transfer paper?**
A: No, you need to use an inkjet or laser printer that is compatible with the specific type of tattoo transfer paper you are using. Check the manufacturer’s instructions for compatibility information.
**Q4: Is it safe to use Sharpie markers on my skin?**
A: Sharpie markers are not designed for skin application and may cause irritation or allergic reactions. Use this method with caution and at your own risk. Opt for skin-safe markers or other methods whenever possible.
**Q5: How do I prevent my fake tattoo sleeve from smudging?**
A: To prevent smudging, avoid touching or rubbing the tattoo, especially when it’s wet. Apply a thin layer of setting spray to help seal the design. Avoid wearing tight clothing that can rub against the tattoo.
**Q6: Can I create a full-color tattoo sleeve using transfer paper?**
A: Yes, you can create a full-color tattoo sleeve using transfer paper. However, the colors may not be as vibrant or long-lasting as with other methods. Use high-quality color inks and consider applying a sealant to protect the colors.
**Q7: What’s the best way to remove a fake tattoo sleeve?**
A: The removal method depends on the type of tattoo. Transfer paper tattoos can be removed with baby oil or rubbing alcohol. Henna tattoos will fade naturally over time. Sharpie tattoos can be removed with rubbing alcohol and gentle scrubbing.
**Q8: How can I make my henna tattoo darker and longer-lasting?**
A: To achieve a darker and longer-lasting henna tattoo, keep the henna paste warm while it’s drying, apply a mixture of lemon juice and sugar after removing the dried paste, and avoid washing the area with soap and water for at least 24 hours.
**Q9: Are there any pre-made fake tattoo sleeves available for purchase?**
A: Yes, there are many pre-made fake tattoo sleeves available for purchase online or at costume shops. These are typically made of nylon or spandex and feature printed tattoo designs.
**Q10: What are the potential risks of using fake tattoo sleeves?**
A: The potential risks of using fake tattoo sleeves include allergic reactions to the materials used, skin irritation from adhesives or inks, and smudging or fading of the design. Always test a small area of skin before applying a full tattoo sleeve.
Conclusion & Strategic Call to Action
Creating your own **fake tattoo sleeve** is a fantastic way to experiment with body art, express your individuality, and enhance your look for various occasions without the commitment of permanent ink. We’ve covered several methods, from the realistic transfer paper technique to the natural henna option, and even touched upon the quick (but cautioned) Sharpie method. Remember, the key to a successful fake tattoo sleeve lies in careful design, precise application, and the use of high-quality materials. We’ve provided expert guidance throughout this article, aiming to empower you with the knowledge and skills necessary to create a stunning and convincing temporary tattoo.
Whether you’re looking to test out a potential tattoo design, complete a costume, or simply have some fun, making your own fake tattoo sleeve offers a creative and accessible solution. Now that you’re equipped with the knowledge, it’s time to put your artistic skills to the test and create a temporary masterpiece.
Share your experiences with creating your own fake tattoo sleeves in the comments below! What methods have you tried, and what tips do you have for others? Explore our advanced guide to tattoo design for even more inspiration. Contact our experts for a consultation on personalized tattoo sleeve designs.
