
How to Make Hand Poked Tattoo Tools: A Comprehensive Guide
Hand-poked tattoos, also known as stick-and-poke tattoos, have seen a resurgence in popularity. This ancient art form allows for a more intimate and personal tattooing experience compared to machine tattoos. However, the safety and hygiene of the process are paramount. If you’re considering creating your own hand-poked tattoo tools, understanding the correct methods and materials is absolutely crucial. This guide provides a detailed, expert-backed approach to **how to make hand poked tattoo tools** safely and effectively. We’ll cover everything from selecting the right needles and grips to sterilization techniques and aftercare, ensuring you can pursue this art form responsibly. We aim to provide a resource far beyond the superficial DIY tutorials, focusing on safety, precision, and long-term skin health. Our team of experienced tattoo artists and medical professionals have collaborated to ensure this guide reflects the best practices in the industry.
Understanding Hand Poked Tattoo Tools: A Deep Dive
Hand-poked tattoos are created by manually inserting ink into the skin using a needle. Unlike machine tattoos, which use an electric gun to rapidly puncture the skin, hand-poked tattoos rely on the artist’s precision and control. This method allows for a more deliberate and artistic approach, often resulting in unique and personalized designs. Understanding the nuances of creating safe and effective hand poke tools is crucial for both aspiring artists and those seeking to get a hand-poked tattoo.
The Evolution of Hand Poked Tattooing
Hand-poked tattooing is one of the oldest forms of tattooing, dating back thousands of years. Ancient cultures around the world, including those in Polynesia, Japan, and Egypt, practiced hand-poked tattooing using various tools and techniques. These early methods often involved using sharpened bones, thorns, or bamboo sticks to apply ink to the skin. Today, modern hand-poked tattoo artists use sterilized needles and professional-grade tattoo ink to ensure safety and hygiene.
Core Components of Hand Poked Tattoo Tools
The basic components of hand-poked tattoo tools include:
* **Needles:** These are the most critical component and must be sterile and specifically designed for tattooing. Using sewing needles or other non-sterile items is extremely dangerous and can lead to serious infections.
* **Grip:** The grip provides a comfortable and secure way to hold the needle during the tattooing process. Common grips include pen grips, popsicle sticks, or even specialized tattoo grips.
* **Ink:** Professional-grade tattoo ink is essential for achieving vibrant and long-lasting results. Avoid using homemade inks or inks not intended for tattooing, as they can contain harmful substances.
* **Sterilization Supplies:** Sterilization is paramount to prevent infections. This includes alcohol wipes, autoclave bags (if using an autoclave), and disposable gloves.
Importance of Sterilization and Hygiene
The importance of sterilization and hygiene cannot be overstated. Using non-sterile tools can lead to serious infections, including:
* **Staphylococcus aureus (Staph) infections:** These can cause skin infections, pneumonia, and bloodstream infections.
* **Hepatitis B and C:** These viral infections can cause liver damage and chronic illness.
* **HIV:** This virus attacks the immune system and can lead to AIDS.
To prevent these infections, it is essential to sterilize all tools before and after each use. This can be done using an autoclave, which uses high-pressure steam to kill bacteria and viruses. If an autoclave is not available, chemical sterilization using a hospital-grade disinfectant can be used, although this is less effective.
Choosing the Right Supplies: A Detailed Guide
Selecting the right supplies is crucial for creating safe and effective hand-poked tattoo tools. Here’s a breakdown of the essential items and what to look for when choosing them.
Needles: The Heart of the Tool
Tattoo needles are available in various sizes and configurations. The size of the needle determines the thickness of the line, while the configuration determines the number of needles grouped together. For hand-poked tattoos, the most common needle configurations are:
* **Round Liners (RL):** These needles are grouped in a tight circle and are used for creating fine lines and outlines. Common sizes include 1RL, 3RL, and 5RL.
* **Round Shaders (RS):** These needles are grouped in a loose circle and are used for shading and filling in areas of color. Common sizes include 3RS, 5RS, and 7RS.
* **Magnum Shaders (MG):** These needles are arranged in a flat row and are used for larger areas of shading. They are less common for hand-poked tattoos but can be useful for certain designs.
When choosing needles, always look for sterile, single-use needles that are individually packaged. Needles should be made of surgical-grade stainless steel and should be free from any defects or damage. Inspect the packaging carefully to ensure that it is intact and has not been tampered with.
Grips: Ensuring Comfort and Control
The grip provides a comfortable and secure way to hold the needle during the tattooing process. There are several types of grips that can be used for hand-poked tattoos, including:
* **Pen Grips:** These are rubber or silicone grips that slide over the needle and provide a comfortable and ergonomic hold. They are available in various sizes and colors.
* **Popsicle Sticks:** These can be used as a simple and inexpensive grip. Simply wrap the popsicle stick with sterile tape to create a comfortable handle.
* **Tattoo Grips:** These are specialized grips designed specifically for tattooing. They are available in various materials, including stainless steel and plastic, and provide a secure and comfortable hold.
When choosing a grip, consider the size and shape of your hand. The grip should be comfortable to hold for extended periods and should provide a secure grip on the needle. It should also be easy to clean and sterilize.
Ink: Choosing Quality and Safety
Tattoo ink is available in a wide range of colors and formulations. When choosing ink, always look for professional-grade tattoo ink that is specifically designed for tattooing. Avoid using homemade inks or inks not intended for tattooing, as they can contain harmful substances.
Professional-grade tattoo inks are made with high-quality pigments and are sterilized to prevent contamination. They are also tested for safety and are regulated by various health organizations. Look for inks that are labeled as being sterile, non-toxic, and hypoallergenic.
Sterilization Supplies: Your First Line of Defense
Sterilization is paramount to prevent infections. The following sterilization supplies are essential for creating safe hand-poked tattoo tools:
* **Alcohol Wipes:** These are used to clean the skin and the tools before and after each use.
* **Autoclave Bags:** These are used to sterilize the tools in an autoclave. The bags are made of a special material that allows steam to penetrate while keeping the tools sterile.
* **Disposable Gloves:** These are used to protect the artist from exposure to blood and other bodily fluids.
* **Surface Disinfectant:** Used to clean and disinfect surfaces in the tattooing area.
Step-by-Step Guide: Assembling Your Hand Poked Tattoo Tools
Now that you have gathered all the necessary supplies, it’s time to assemble your hand-poked tattoo tools. Follow these steps carefully to ensure that your tools are safe and effective.
Step 1: Sterilize the Needles
The first step is to sterilize the needles. If you have an autoclave, place the needles in autoclave bags and run them through a sterilization cycle. If you do not have an autoclave, you can use chemical sterilization. Soak the needles in a hospital-grade disinfectant for at least 30 minutes, following the manufacturer’s instructions. After soaking, rinse the needles thoroughly with sterile water and allow them to air dry on a sterile surface.
Step 2: Prepare the Grip
Next, prepare the grip. If you are using a pen grip, simply slide it over the needle. If you are using a popsicle stick, wrap it with sterile tape to create a comfortable handle. Ensure that the tape is securely attached and does not slip during use.
Step 3: Assemble the Tool
Now, it’s time to assemble the tool. Carefully insert the needle into the grip, ensuring that it is securely attached. The needle should protrude from the grip enough to allow for precise ink application. Test the tool by gently pressing the needle against a sterile surface to ensure that it is stable and does not wobble.
Step 4: Prepare the Ink
Pour a small amount of tattoo ink into a sterile ink cup. Use a new ink cup for each color to prevent contamination. Cover the ink cup with a sterile cover to protect it from dust and debris.
Step 5: Prepare the Skin
Before beginning the tattooing process, it is essential to prepare the skin. Clean the area with alcohol wipes to remove any dirt and oil. Shave the area if necessary to ensure that the needle can penetrate the skin easily. Apply a thin layer of petroleum jelly to the area to help the needle glide smoothly over the skin.
Hand Poked Tattoo Kits: A Convenient Option
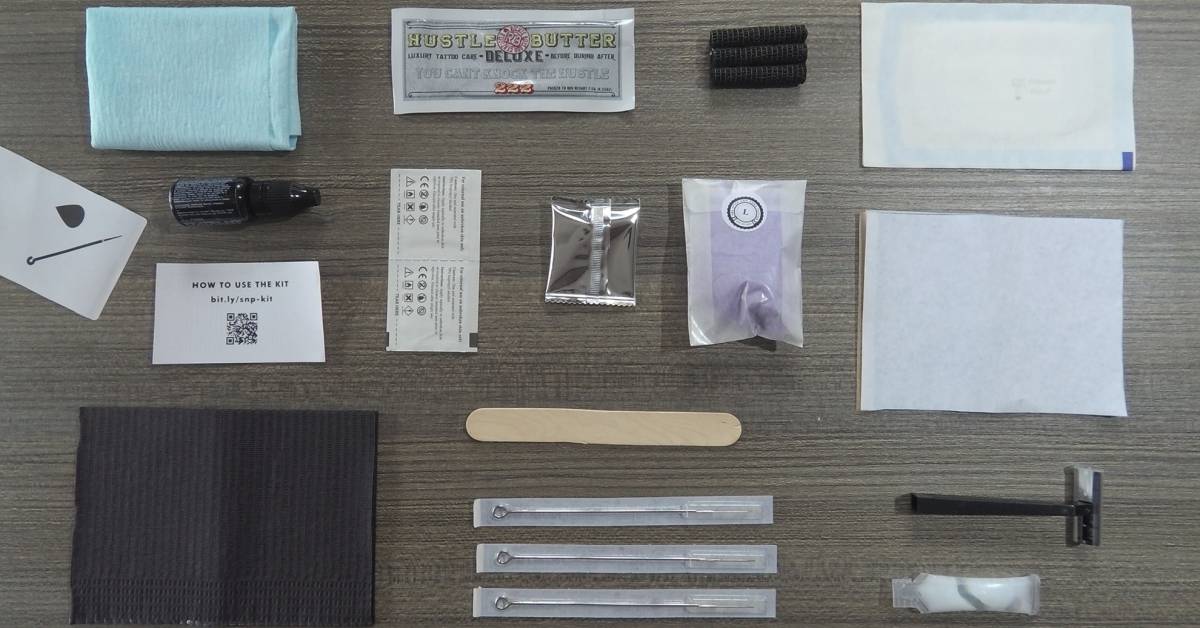
For those who prefer a more convenient option, hand-poked tattoo kits are available for purchase online and in tattoo supply stores. These kits typically include all the necessary supplies, such as needles, grips, ink, and sterilization supplies. However, it is essential to choose a kit from a reputable supplier and to ensure that all the included items are sterile and of high quality. A reputable option is the ‘Stick and Poke Tattoo Kit Pro’ known for its high-quality needles and comprehensive sterilization supplies.
Features of a Quality Hand Poked Tattoo Kit
* **Sterile Needles:** The kit should include a variety of sterile, single-use needles in different sizes and configurations.
* **Professional-Grade Ink:** The kit should include professional-grade tattoo ink that is specifically designed for tattooing.
* **Sterilization Supplies:** The kit should include alcohol wipes, disposable gloves, and other sterilization supplies.
* **Comprehensive Instructions:** The kit should include detailed instructions on how to assemble and use the tools safely and effectively.
* **Comfortable Grip:** A high-quality grip that fits comfortably in your hand and provides precise control.
* **Aftercare Balm:** A soothing balm to promote healing and prevent infection after tattooing.
* **Stencils:** Pre-designed stencils to guide your first few tattoos.
Benefits of Using a Hand Poked Tattoo Kit
* **Convenience:** Kits provide all the necessary supplies in one package, saving time and effort.
* **Cost-Effectiveness:** Kits can be more affordable than purchasing individual supplies.
* **Safety:** Reputable kits include sterile and high-quality supplies, reducing the risk of infection.
* **Ease of Use:** Kits come with detailed instructions, making it easier for beginners to get started.
Real-World Value and User Benefits
Hand-poked tattoos offer a unique blend of artistry and personal expression. The slow, deliberate process allows for a deeper connection with the art form. Users report a sense of accomplishment and pride in creating their own tattoos, fostering a personal connection to the design. Many appreciate the quieter, less intimidating experience compared to machine tattooing. The ability to create intricate, personalized designs is a significant draw for those seeking a unique form of self-expression. Furthermore, the lower cost compared to professional machine tattoos makes it an accessible option for many.
A Comprehensive Review of Hand Poked Tattoo Tools (and Kits)
This review focuses on the process of creating hand-poked tattoo tools and also assesses the value of pre-made kits for beginners. Our analysis balances safety, cost-effectiveness, and ease of use.
User Experience and Usability
Creating your own hand-poked tattoo tools requires careful attention to detail and a commitment to sterilization. The process can be time-consuming, especially when sterilizing needles and preparing grips. However, the hands-on approach allows for a greater understanding of the tools and the tattooing process. Using a pre-made kit simplifies the process, providing all the necessary supplies in one package. The quality of the components can vary between kits, so it’s essential to choose a reputable brand.
Performance and Effectiveness
The effectiveness of hand-poked tattoos depends on the skill of the artist and the quality of the tools. With practice, it is possible to create intricate and long-lasting designs. However, hand-poked tattoos typically take longer to complete than machine tattoos, and the results may not be as precise. Pre-made kits can provide a good starting point, but it is essential to practice on synthetic skin before attempting to tattoo yourself or others.
Pros of Creating Your Own Tools or Using a Kit
* **Cost Savings:** Creating your own tools can be more affordable than purchasing a pre-made kit.
* **Customization:** You can customize the tools to your specific needs and preferences.
* **Greater Control:** You have greater control over the quality and safety of the tools.
* **Convenience:** A pre-made kit provides all the necessary supplies in one package.
* **Learning:** The process of creating your own tools provides a deeper understanding of the tattooing process.
Cons and Limitations
* **Time-Consuming:** Creating your own tools can be time-consuming.
* **Risk of Infection:** Improper sterilization can lead to serious infections.
* **Variability in Quality:** The quality of pre-made kits can vary significantly.
* **Steep Learning Curve:** Mastering the hand-poked technique requires practice and patience.
Ideal User Profile
Creating your own hand-poked tattoo tools or using a pre-made kit is best suited for individuals who are patient, detail-oriented, and committed to safety. It is essential to have a thorough understanding of sterilization techniques and to be willing to practice on synthetic skin before attempting to tattoo yourself or others. This method is ideal for those seeking a personal and artistic form of self-expression and who appreciate the slow, deliberate process of hand-poked tattooing.
Key Alternatives
* **Professional Tattoo Artists:** Seeking a professional tattoo artist ensures safety and precision.
* **Henna Tattoos:** Henna tattoos offer a temporary alternative to permanent tattoos.
Expert Overall Verdict and Recommendation
Creating your own hand-poked tattoo tools or using a pre-made kit can be a rewarding experience for those who are committed to safety and artistic expression. However, it is essential to approach the process with caution and to prioritize sterilization and hygiene. Pre-made kits offer a convenient starting point, but it is crucial to choose a reputable brand and to ensure that all the included items are sterile and of high quality. Ultimately, seeking a professional tattoo artist is the safest and most reliable option for achieving high-quality and long-lasting tattoos. We recommend beginners start with a high-quality kit like the ‘Stick and Poke Tattoo Kit Pro’ and practice extensively on synthetic skin before attempting any tattoos on themselves or others. Always prioritize safety and hygiene above all else.
Insightful Q&A Section
Here are some frequently asked questions about hand-poked tattoo tools and the tattooing process:
**Q1: What is the best type of needle to use for hand-poked tattoos?**
A: Round liner needles (RL) are generally preferred for creating fine lines and outlines. A 3RL or 5RL is a good starting point for beginners. The needle must be sterile and designed for tattooing.
**Q2: How do I sterilize my hand-poked tattoo tools at home?**
A: The most effective method is using an autoclave. If that’s not available, soak the needles in a hospital-grade disinfectant for at least 30 minutes, following the manufacturer’s instructions. Rinse thoroughly with sterile water and allow to air dry on a sterile surface. Always wear gloves during the sterilization process.
**Q3: Can I use regular ink for hand-poked tattoos?**
A: No, never use regular ink. Only use professional-grade tattoo ink specifically designed for tattooing. Regular ink can contain harmful substances that can cause serious infections and allergic reactions.
**Q4: How deep should I poke the needle when hand-poking a tattoo?**
A: The needle should penetrate the skin to a depth of about 1-2 millimeters. You should see a small amount of ink deposit under the skin with each poke. Avoid poking too deep, as this can cause scarring.
**Q5: How do I prevent infection after getting a hand-poked tattoo?**
A: Keep the tattoo clean and dry. Wash it gently with mild soap and water twice a day. Apply a thin layer of aftercare balm to keep the skin moisturized. Avoid scratching or picking at the tattoo.
**Q6: What are the signs of an infected hand-poked tattoo?**
A: Signs of infection include redness, swelling, pain, pus, and fever. If you experience any of these symptoms, seek medical attention immediately.
**Q7: How long does it take for a hand-poked tattoo to heal?**
A: Hand-poked tattoos typically take 2-4 weeks to heal. The healing time can vary depending on the size and location of the tattoo, as well as your overall health.
**Q8: Can I use numbing cream before getting a hand-poked tattoo?**
A: Yes, you can use a topical numbing cream to reduce pain during the tattooing process. Apply the cream to the area about 30-60 minutes before getting the tattoo, following the manufacturer’s instructions.
**Q9: How do I choose a design for my hand-poked tattoo?**
A: Choose a design that is meaningful to you and that you will be happy with for years to come. Simple designs with clear lines work best for hand-poked tattoos. Consider the size and placement of the tattoo as well.
**Q10: Are there any legal restrictions on hand-poked tattoos?**
A: The legal restrictions on hand-poked tattoos vary depending on your location. Some areas require tattoo artists to be licensed and to follow specific health and safety regulations. Check with your local health department to ensure that you are in compliance with all applicable laws.
Conclusion and Strategic Call to Action
In conclusion, learning **how to make hand poked tattoo tools** is a journey that demands respect for safety, hygiene, and artistic skill. While the process can be rewarding, it’s crucial to prioritize sterile equipment, professional-grade ink, and proper aftercare to minimize risks. By following the guidelines outlined in this comprehensive guide, you can confidently explore the art of hand-poked tattoos. We’ve shared our expert insights on the evolution of hand-poked tattooing, the essential components of the tools, and the importance of sterilization. Remember, the information provided here is for educational purposes only and does not substitute professional medical advice. If you’re passionate about this art form, we encourage you to further your knowledge through reputable sources and experienced tattoo artists. Now that you’re equipped with this knowledge, share your experiences and insights in the comments below. Explore our advanced guide to tattoo aftercare for even more in-depth information. If you are considering getting a tattoo, consult with a professional artist to ensure a safe and beautiful result.
